
Information exchange has become the inherent fact of our daily life. We have an iPhone in our pocket and we carry it everywhere in case we come across some unexpected interesting picture which we definitely need to take. We keep iPad on our kitchen table to find some delicious recipes and then make few incredible shots of our cooking to share on Instagram.

We have got a MacBook or iMac on our office desktop for work projects and again for sharing work files and documents. We could keep going on like this forever. Of course, there are a number of ways to transfer photos, videos, files and other content from one Apple gadget to another. However, we are convinced that the most simple and efficient way of data sharing is AirDrop, the option especially designed for this purpose by Apple .
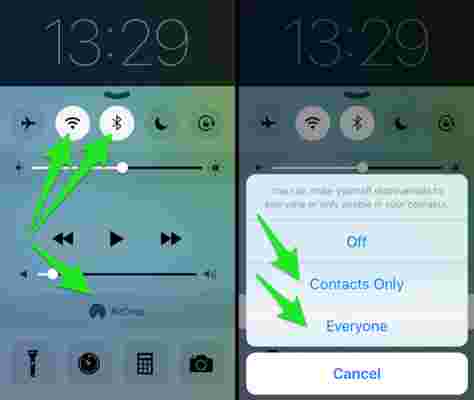
So, to start transferring or sharing your data, you need to enable AirDrop on your device. Start by launching Contact Center
(1). Swipe up from the bottom bezel of your iPhone or iPad. The second step is to turn on Bluetooth and Wi-Fi (2). Go to Settings > choose these options and tap them on. It’s not necessary to be on a network, just turn on the Wi-Fi. After that, you should enable AirDrop itself (3) which is located also in the swipe-up menu. Then, you need to select one of two options: tap on Contacts only or Everyone (4).
Be careful when you choose Everyone from the menu as it means exchange with random people you don’t know. Choosing Contacts is safer but requires a bit more work . Both people who are making the exchange should be logged into iCloud and have each other in the contacts list.
The next step is to figure out how to send a file via AirDrop.
– Find a file you want to transfer (photo, video, document etc). – Tap the Share button (you will find a box with an arrow under the file):
– Then you need to choose the person you would like to share to.
This was an example how to share files using iPhone or iPad. Below you will see how to enable AirDrop on a Mac:
Launch Finder. – Click on AirDrop on the left area. – Choose on to enable AirDrop and select Contacts or Everyone. – Often the described instructions are very simple but sometimes
You may face some difficulties. Let’s reveal how to overcome possible problems. – The very first thing you should check is whether every device has AirDrop turned on. – If you have Personal Hotspots turned on, this should be changed to off. – Make sure Bluetooth and Wi-Fi are on. – In case of any problems, it’s recommended that you choose Everyone in the AirDrop menu. It often works better. – If that trick doesn’t help, try a soft reset on your iPhone or other Apple device. In many cases, it helps but if not, follow the next step. – Open Settings on your Mac, go to the System Preferences, select Security&Privacy, then select Firewall Options. -If Firewall is turned on click Firewall Options. – Make sure Block all incoming connections is not checked:
– If you are trying to AirDrop between a newer Mac and an older Mac, try to click Don’t see who you’re looking for and select Search for an Older Mac. That should help.
– If any of these tips don’t for you, try to deactivate and then reactivate your iCloud account. – Lastly, if nothing suggested so far works it could be your Bluetooth Preference file. Switch off your Bluetooth. Navigate to the main Library folder, open the Preference folder and delete the file called com.apple.Bluetooth.plist. Empty your Trash and only then turn Bluetooth back on.
We hope these instructions work for you. So, don’t get upset if you experience any issues with Airdrop, just calm down and try these suggestions step by step. Then, perform your sharing process with pleasure.